Gonna mount it on the weekend!
Thursday, January 31, 2013
JRi Shock
The new rear suspension has arrived. Check out the video review here:
Gonna mount it on the weekend!
Gonna mount it on the weekend!
Sunday, January 27, 2013
Some inspiration
Warmer weather this weekend; while I did a bit of work on the ex650, I spent some time working on a wiring diagram for the Cafe Racer. My first attempt was close, but even better solicited some sympathetic support from XS650forum.com, and someone did up a really nice one for me, all computer generated and color coded. The kids and I will start the wiring process shortly. Follow the progress at http://www.tcskidscafe.blogspot.ca/.
 On the ex, I simply mounted the rain tire on the black front wheel (sold the red one to Wilson, who has gone the way of the diesel after selling his TZ250), and got the bike off the front stand. Still waiting on some rotor spacers for the Carrozzeria wheel, but at least the back-ordered wrist pin has arrived. So my new OEM piston set is complete, and according to Canada Post, my Cylinder head has arrived at RLR in the UK. Should hear from Rick shortly as to progress on that build. I also have come to understand that RLR has a Isle of Man-winning pedigree, winning two races with a certain John McGuinness on an RVF400.
As usual, my head is full of ideas on how to improve the racebike. I've gotten some inspiration from a supertwin racer posted on eBay UK. I even was able to ask some questions of the seller...
J!FBRw~~60_12.JPG) The first photo looks pretty typical, in that it has an aftermarket front fork, ZX6 bodywork (however with the ram air in the nose filled in), and what looks to be a cbr600 tail section. However, what are those 4 holes doing in the leading edge of the fairing...?
The first photo looks pretty typical, in that it has an aftermarket front fork, ZX6 bodywork (however with the ram air in the nose filled in), and what looks to be a cbr600 tail section. However, what are those 4 holes doing in the leading edge of the fairing...?
uPBQ5)I)7h+g~~60_12.JPG) What you can better see from this angle is the side mounted radiators! The owner used the radiators from an RC51 (hmmm, I had one of those!), and some serious plumbing work to get them to work properly. Of course, removing the rad from the front allows a gaping ram/cold air intake in the front -- unfortunately no detail pics on that were available.
What you can better see from this angle is the side mounted radiators! The owner used the radiators from an RC51 (hmmm, I had one of those!), and some serious plumbing work to get them to work properly. Of course, removing the rad from the front allows a gaping ram/cold air intake in the front -- unfortunately no detail pics on that were available.
IklUG!~~60_12.JPG) The other side has the matching half from the Honda. The rads themselves have a fitting for a water temp gauge. Note the rearset plates look an awful lot like my homemade jobbies pre-woodcraft. No shift lever? The owner lost his left leg, and has to use a right hand shift -- not the rod extending up from the shift spline, to carry over to the right hand side of the bike. Genius!
The other side has the matching half from the Honda. The rads themselves have a fitting for a water temp gauge. Note the rearset plates look an awful lot like my homemade jobbies pre-woodcraft. No shift lever? The owner lost his left leg, and has to use a right hand shift -- not the rod extending up from the shift spline, to carry over to the right hand side of the bike. Genius!
IIg,jw~~60_12.JPG) The other bit of ingenuity is the aluminum subframe.
The other bit of ingenuity is the aluminum subframe.
IWSfq!~~60_12.JPG) In the long term I envision an aluminum monocoque subframe/seat, sorta like what the GP have in carbon fibre. I would use aluminum sheet rather than the tubing shown here, and have an fibreglass "pod" attached to the rear for aerodynamics.
In the long term I envision an aluminum monocoque subframe/seat, sorta like what the GP have in carbon fibre. I would use aluminum sheet rather than the tubing shown here, and have an fibreglass "pod" attached to the rear for aerodynamics.
 Here is a sketch I came up with awhile ago. This would also necessitate a custom fuel tank -- in order to remove as much rear subframe as possible, and to move the ECU forward. A faux fuel tank cover would be made to replicate the shape of the original, and hide the smaller tank which could be mounted to the main frame rails. The seat pan would then attach to the top of the frame, as well as utilize the mounts for the rearsets. This could potentially be bent into the right shape, but I think I would need 1/8" aluminum sheet, so perhaps cutting out via templates and welding is a better option. The battery could be mounted on the inside of the subframe as above, with the undertail being bolted into place, adding some rigidity to the structure. The fuse box and powercommander would also fit easily in the space provided.
With this solution, the tank is mounted to the main frame, not the subframe. The ECU is moved forward for easy access, and the weight transfer of 2 gals of fuel sloshing forward in the space for 4 gallons would be eliminated -- centralizing the mass. A foam seat pad would be attached to the aluminum subframe itself; the "pod" of the tail would be bolted to the back of the seat (like the Aprilia RS250). In the event of a crash, the fibreglass pod would bear the brunt of the damage, and could be easily replaced.
On the ex, I simply mounted the rain tire on the black front wheel (sold the red one to Wilson, who has gone the way of the diesel after selling his TZ250), and got the bike off the front stand. Still waiting on some rotor spacers for the Carrozzeria wheel, but at least the back-ordered wrist pin has arrived. So my new OEM piston set is complete, and according to Canada Post, my Cylinder head has arrived at RLR in the UK. Should hear from Rick shortly as to progress on that build. I also have come to understand that RLR has a Isle of Man-winning pedigree, winning two races with a certain John McGuinness on an RVF400.As usual, my head is full of ideas on how to improve the racebike. I've gotten some inspiration from a supertwin racer posted on eBay UK. I even was able to ask some questions of the seller...
J!FBRw~~60_12.JPG)
uPBQ5)I)7h+g~~60_12.JPG)
IklUG!~~60_12.JPG)
IIg,jw~~60_12.JPG)
IWSfq!~~60_12.JPG)

With this solution, the tank is mounted to the main frame, not the subframe. The ECU is moved forward for easy access, and the weight transfer of 2 gals of fuel sloshing forward in the space for 4 gallons would be eliminated -- centralizing the mass. A foam seat pad would be attached to the aluminum subframe itself; the "pod" of the tail would be bolted to the back of the seat (like the Aprilia RS250). In the event of a crash, the fibreglass pod would bear the brunt of the damage, and could be easily replaced.
Sunday, January 20, 2013
Caliper Cleaning and Brake Work
Another bitterly cold weekend, so I hoped to spend any time working on the bike inside, rather than brave the elements of the insulation-free garage... ambient air temp was -25 C. Ugh.
 So I thought I would put my new Yamaha caliper tool to use. I am not even sure if Yamaha sells a tool to do this, so a guy in the UK machined a socket to work in the "blue spot" calipers (although mine are yellow) to allow for easier brake piston removal.
 Sure enough, combined with an air compressor (stored inside overnight so it would actually operate) and the piston removal tool I bought last year, the calipers came apart with little fuss.
 Next I "cooked" them in the ultrasonic cleaner for some time. Nice, in that it doesn't involved any caustic/smelly chemicals, some of which have a tendency to destroy the rubber seals or cause them to swell, and then tear when the pistons are put back into the bores. Some liberal use of the "made for brake seal" rubber grease, and everything came back together nicely. Note the new Spiegler brake lines as well. Fitted perfectly -- a 2-line system, so no splitter. Came with aluminum banjo bolts, which were a doddle to drill for safety-wiring. Finally, Spiegler lines allow you to twist the banjo end (using a supplied tool) to properly align things at both ends. Makes life much easier when fitting the stainless lines.
 So, at the top end of the system, the super-quick throttle has been fitted, new lines, along with the brake lever, steering damper (note adjustable end), number plate, and aluminum "dash".
 On the other side, the clutch lever, thumb brake, and thumb brake reservoir can be seen. Not sure I mentioned it, but I got Celtic Machining (a contact from the Kids Cafe project) to machine the face of the banjo fitting to stop some weeping that was taking place previously. Will wait until the spring to bleed the system as I am worried that the process is hard on the brake components.
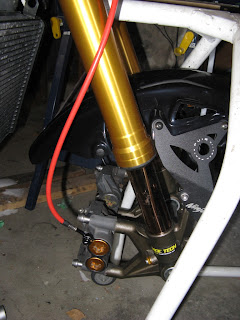
Next, the rear shock has been completed and will be on its way to me shortly. Will be interesting to see how it turns out!


Next, the rear shock has been completed and will be on its way to me shortly. Will be interesting to see how it turns out!
Saturday, January 19, 2013
Weight Saving
For fun, I borrowed a digital scale from the science lab at school and compared the two rear axles.
 The stock, steel one: 828 grams, which works out to 1lb, 13 oz!
 Next, I put the Triumph 675 rear axle on the scale -- aluminum, and hollowed out. The result was 408 grams, which works out to 14.392 oz!
The result is a rear axle that is half the weight of stock, or 420 grams lighter, or 14.815 oz -- nearly a pound!


The result is a rear axle that is half the weight of stock, or 420 grams lighter, or 14.815 oz -- nearly a pound!
Wednesday, January 16, 2013

Sunday, January 13, 2013
More Sponsorship News!
For 2013 (and beyond, likely!) Piston Broke Racing will be sporting Pilot Leathers. As a part of their rider support program, I will be wearing a set of custom-made leathers -- Pilot will be constructing an "EVO" model 1-piece suit, made to my "oversquare" dimensions. As a part of the process, the guys at Pilot have sent a first draft of their suit design.
 Note the sponsor patches, and proper "Piston Broke Racing" logo. I was able to list the names of PBR sponsors, and sent a jpeg of the race number as well as the PBR logo in a vector file. While this is not the final version, it gives you a sense of what the set of skins will look like. The process is quite simple, in that pilot has a measurement form, where someone can measure/reveal the awful truth about your actual body size, and this can be sent to pilot for them to construct. A custom suit is more expensive, however not much more than a new, top of the line Spyke or Arlen Ness, and actually cheaper than a Kushitani suit. Furthermore, sponsor patches and logos are included in the price. If you are more "normally" proportioned, an off the rack suit is cheaper, and they also have "split sizing" available. Since I am 5'8", 200 lbs, with a 29" inseam and a 45" chest, I am NOT "off the rack". Using engine terminology, I am "oversquare" -- a short stroke with a larger bore!
 I've asked the designers to use this suit design to compare, and try the PBR logo on the front, rather than the back. Not sure how it will work with the zipper splitting the logo, however... Obviously the 91 will have to be another color other than red.
If anyone is interested in getting a good deal on a top of the line Spyke Titanium suit in 48/58, I've posted it to the Wera forums here: http://weraclassifieds.com/ads/spyke-titanium-suit-for-sale-free-boots-included/


If anyone is interested in getting a good deal on a top of the line Spyke Titanium suit in 48/58, I've posted it to the Wera forums here: http://weraclassifieds.com/ads/spyke-titanium-suit-for-sale-free-boots-included/
Saturday, January 12, 2013
Rebuild


A word about the temperature. Working in the garage today it was -21 Celsius... that is -6F for you Fahrenheit types. When sanding with the mask on, the humidity from your breath coats the inside of the breathing apparatus with condensation, and if the mask is left outside afterward, it freezes solid. Your fingertips get so numb that you lack any tactile sensation, so you are constantly dropping nuts and bolts. Finally, for several hours afterward, your fingers feel like needles are jabbing into them... a sign of minor frostbite. I have decided that a summer project is to finally insulate the garage... for NEXT winter!
Wednesday, January 2, 2013
Wheels have Arrived

The wheel fit perfectly! The spacers used are "captured" in that they don't fall out and roll all over the garage when you line things up. A great looking rim that is 5.5" in width, which will allow for a 180 rear tire.
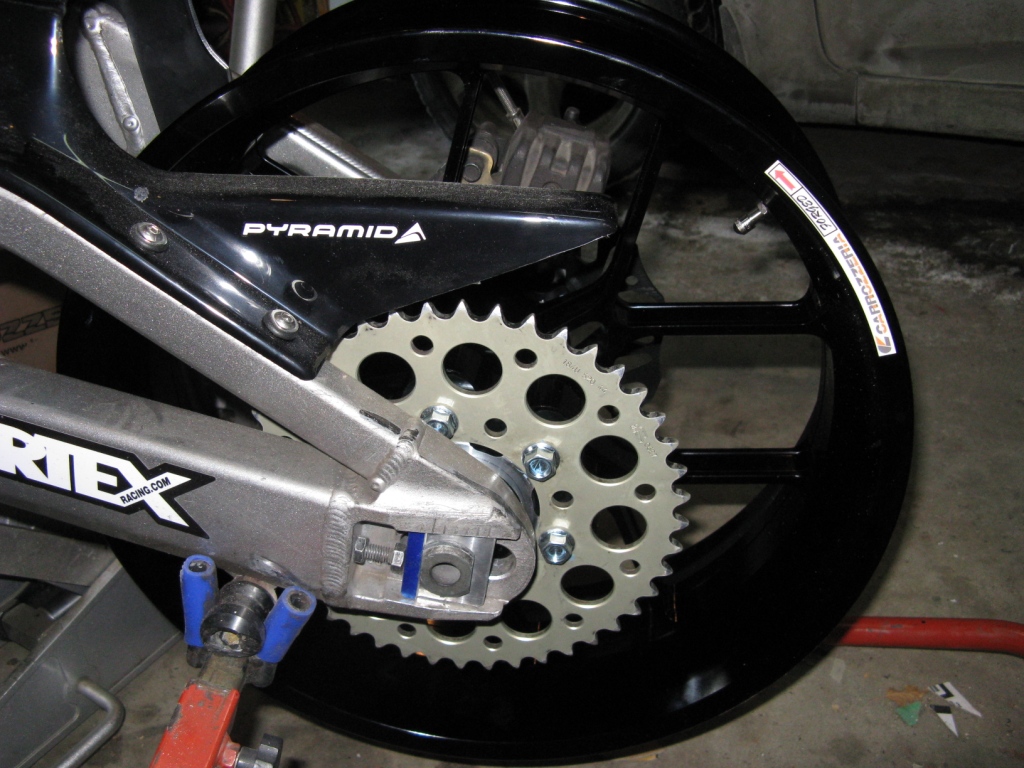


Based on what I have seen so far, these wheels are an awesome deal, considering many factors...
- they are cheaper than Marvic and Marchesini, as well as Dymag.
- From what I can see, they are on the only manufacturer of bespoke wheels for the ex650/er6.
- It was fairly straightforward to order -- I indicated that the front and rear were from different models, but they had no problem sending me what I needed.
- All the stock hardware fits -- rotors, sprockets, spacers, etc.
- If you are a supertwin/mintwin racer, you should really consider these wheels. Many other color options are available, and they of course have a front rim to work with the stock ex650 forks (for minitwin racers)
- Considering the pound/euro vs US dollar right now, British/Euro riders should really consider these wheels as an upgrade for their bikes.
I shudder to think of the hassle of retrofitting wheels from other machines onto my project. I doubt anything would have fit as nice as these did... I envisioned the purchase price (when suitable wheels could be found), and then the hassle of machining the necessary spacers and etc. to make them work. This is a bolt on affair!
Of course, the Level 2 sponsorship discount sweetened the deal considerably, but even at the list price, these ARE the only option, in my opinion. Getting the rear rotor thrown in for free only added to the quality of these rims.
Factoring the weight saving of the hollow rear axle, and these wheels, the bike will likely be noticeably lighter on its feet come the spring. I can't wait.
For now, the wheels will be stored downstairs out of the cold. No sense mounting new race rubber and then letting them freeze outside!
Subscribe to:
Posts (Atom)