Monday, January 25, 2010

Bike Club Complete

We did it -- over the course of a few after school sessions, we rebuilt the supermono!


What you can't see is the "keep door locked at all times" sign -- untold dollars of time, parts, and tools behind this door!


This is where we started on day 5... an electrical gremlin needed to be found (which I did by staying late on day 4), but you can see the tail securely in place, and the exhaust system mounted.


Rear view -- oil tank breather hose was later shortened and tucked under the tail.  Still need to sort the remote reseviour on the shock. 


RHS view -- rear brake clears the exhaust can.  I searched the entire garage for an hour, going through many coffee cans worth of spare parts, just to find the little bracket that attaches the brake pedal to the threaded master cylinder rod.  I KNEW I had one somewheres... never throw anything out!


LHS view. Muffler brackets are temporary -- gonna make something up in stainless steel, or perhaps aluminum, if I can source the right stuff.  The picture immediately below it is the mega-expensive Yoshimura system that inspired it.  Can't wait to hear it!


A bit less Carbon-fibre on my system...

Fairings on, ready to roll (not quite, but it looks good!)
Front view -- note fair trade coffee in the background.  A student club sells it to the teachers and kids and sends the money to the local Marquis project...
A bit tidier, anyway... remote reseviour line for the shock is just a bit too short to neatly attach anywhere.  Need to sort a solution somehow.

Sunday, January 17, 2010

Cool Supermono Videos


I found this trolling youtube. Home-made exotica!


Inspiration for my bike


for when I win the lottery...

Reassembly

After the first two sessions of "Bike Club", the 'mono has begun to come together again.  It's been a fun experience... some great questions from the kids, and a few funny stories as well.  In some cases, it has been a lesson of "stop, take it all apart, and start again"... although the tendency to quit when it doesn't go right the first time has been apparent.  Its stuff like this that teaches persistence... "nothing worth doing comes easy, right?"

Very quickly we got to this point, part way through the second bike club session.  The lads did a lot of the work themselves, with some direction from me.  You'll notice that the subframe has been cut down quite a bit -- this is to allow the RS125 tail to fit.  As well, you can see the new Magura radial front master cylinder (16mm).


You can see me in the background attacking the tail section with a dremel.  Again, one student was shocked that a new piece from a different bike didn't just slide into place.  From my perspective, the 45 mins of measuring, cutting, and fitting (and re-fitting, and....) went surprisingly well!


Tail on the bike -- I think I'll be able to use a section of the ex250 seat pan to smooth the transition from the seat to the tank -- should look much better.  This is when we quit on Friday -- around 5:15pm -- notice that it is already dark outside through the windows!


The other good thing a few extra sets of hands are helpful for is measuring.  I had to custom-make a throttle cable, so I mated it to a Domino GP throttle, and then soldered on a new end (I bought a kit from the UK).  For those that have done this before, the satisfaction of self-sufficiency is very.... satisfying.  I made this!  Here's hoping it holds together!

Tuesday, January 12, 2010

The kids are alright....

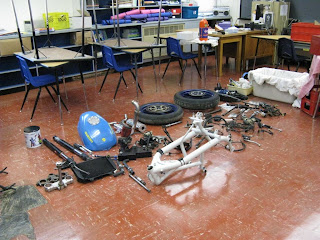
I hope.  I guess I am a closet power mech teacher... I've always wanted to get students involved in mechanics, either bike, car, lawnmower, whatever.  So I've got a 3-week window where there is a spare classroom at school, and me and some interested students are going to rebuild the 'mono after school.

The bike got into its current state after I picked up the machine from Cycleboyz after the exhaust was fabricated.  Looked awesome, will soon post a pic on the website itself, with it on the motorcycle.  You can see it to the right of the fuel tank in the picture.  Hopefully the kids won't see this and panic tommorow -- will see it as a jigsaw puzzle/mecchano set to put together.


When I re-did the valves, springs, and rings, I didn't have a new cam chain tensioner gasket on hand.  I now have one (two, actually -- spares), and I thought I'd triple check the valve timing... I have nightmares of expensive valves hitting the piston.  I did turn it over several times on the bench previously, but I just want to be sure... too much at stake!
Note unused "BFH" to the left...


Stainless steel lovliness -- quite light, and will look pretty cool!  Ordered a new exhaust gasket from Scotty at Transcanada as well.


The plan is to take pics of the rebuild, and post the progress.  Those who participate will sign the new RS125 tail section after I've painted it, but before it is clearcoated... their legacy!