Sunday, November 29, 2015

Three on the go

I'm currently involved in 3 projects... a good thing, as it keeps me busy over the winter.  Without this I might take up an expensive, dangerous habit.
First the 'mono.  I've stripped the tank back to bare metal.  Not that I am a steampunk fan or rat rod person, I just like the look.  The seat and fairing will be black, with a textured finish.  This will "force" me to concentrate on the mechanical side of the bike, and not spend so much time over appearances.  Yeah, it can't look like a nail, but I am going to ride the thing!  The blue tank cap looks nice against the metal.

However,  1 cool and 1 not so cool things came up.


The cool...  Some neat brazing became apparent.  This is at the front of the tank where there is a tough weld area.  You can see brass spot welds as well as a bead along the front.  Looks fine in my opinion.  Bracket that affixes to the rubber strap is also secured this way.  You can still see a bit of paint leftover I need to tidy up.  The epoxy base or primer on this tank is very tough!


Not so cool...  Dent #1 and...


Dent #2.  Don't care, I'm leaving it as is.  I'll call this  "patina".  Someone did a great job with bondo/filler at one point.  Never noticed it under the paint.


Some more work on the zx7r front.
J Model swingarm (far lighter than the P model, and allegedly lighter than the zx9r model).  Big difference is that the shock tunnel is box-section and welded on the J bike, and the P swingarm has a big forged section.  The P swingarm likely took far less time to build in the factory, with perhaps more strength.  The trade off would be overall weight.


I've installed and bled the Frando brake and clutch masters, as well as scored a woodcraft bar end slider/lever guard.  The Chinese lever guard I had previously was pretty weedy.  The clutch feels good, the brakes have a few more bubbles to get rid of!  Next step is to take the swingarm to my welding guru to get a brake caliper hanger stay/tab welded on.

Saturday, November 21, 2015

Cafe Mono News

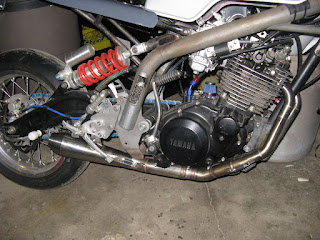
Its taken awhile, as my tig-welding guru at IronKraft was busy with other projects.  However, he's reworked the exhaust on the CafeMono project, and I've now got it back in the garage.


The under-seat, vibration-prone version 1 has been replaced with hopefully a more comfortable option.  The first part of the work was around the header area, drastically changing the routing, but hopefully re-using the 2-1 junction that we started with.  For some reason, I can't flip this picture for the blog.


At the exit, a small megaphone muffler (yes it has some baffling) is used.  The mount is from an R1, and aluminum bracket with a rubber bushing and tophat spacer.  Should allow some movement and isolate the vibes somewhat.  The rubber bushing is also an individual piece, so it can be ordered separately if it wears out.  Yep, the exhaust fires right on to the delrin rearset bobbin.  We might have to switch that out for something made of metal.  Hiking the exhaust upwards would lead to more clearance problems under the engine.

Sunday, November 8, 2015

A bit more work

Got the front forks returned from Race Tech this week.  New proper weight springs, oil, seals, and bushings.  Should be good to go!


Also got a race tail from Squidskinz.  Its made with polyester resin, not epoxy, so it isn't as flexible as the sharkskinz fairings.  However, it didn't take me that long to fit -- only fabbing a few brackets for the rear mount in aluminum, and relocating the ECU, and it went on pretty well.  Also bought an undertail, so I've come up with a way to mount that fairly effectively with quick-release mounting pins.

You can also see the black pinstripe on the tank I added, and the whole lot has been clearcoated.  Lower bellypan fairing is currently being painted, then the tail, and then finally the upper.  I also got a set of vortex rearsets fairly cheaply, which seem far sturdier than the pro-tek ones I had, which I will keep as a spare set.
GPR damper mount on the triple.  I swapped out the nice oberon nut, as it will be covered up when the damper is installed.  Frando brake and clutch levers are also on, and everything clears everything... the kurvygirl resevoir mounts help here!  You can also see the absence of a keyed switch, replaced with the on/off switch on the left handlebar.  I also now need to shorten the throttle cable, and come up with some sort of choke cable solution.