Another bitterly cold weekend, so I hoped to spend any time working on the bike inside, rather than brave the elements of the insulation-free garage... ambient air temp was -25 C. Ugh.
So I thought I would put my new Yamaha caliper tool to use. I am not even sure if Yamaha sells a tool to do this, so a guy in the UK machined a socket to work in the "blue spot" calipers (although mine are yellow) to allow for easier brake piston removal.
Sure enough, combined with an air compressor (stored inside overnight so it would actually operate) and the piston removal tool I bought last year, the calipers came apart with little fuss.
Next I "cooked" them in the ultrasonic cleaner for some time. Nice, in that it doesn't involved any caustic/smelly chemicals, some of which have a tendency to destroy the rubber seals or cause them to swell, and then tear when the pistons are put back into the bores. Some liberal use of the "made for brake seal" rubber grease, and everything came back together nicely. Note the new Spiegler brake lines as well. Fitted perfectly -- a 2-line system, so no splitter. Came with aluminum banjo bolts, which were a doddle to drill for safety-wiring. Finally, Spiegler lines allow you to twist the banjo end (using a supplied tool) to properly align things at both ends. Makes life much easier when fitting the stainless lines.
So, at the top end of the system, the super-quick throttle has been fitted, new lines, along with the brake lever, steering damper (note adjustable end), number plate, and aluminum "dash".
On the other side, the clutch lever, thumb brake, and thumb brake reservoir can be seen. Not sure I mentioned it, but I got Celtic Machining (a contact from the Kids Cafe project) to machine the face of the banjo fitting to stop some weeping that was taking place previously. Will wait until the spring to bleed the system as I am worried that the process is hard on the brake components.
Next, the rear shock has been completed and will be on its way to me shortly. Will be interesting to see how it turns out!
Sunday, January 20, 2013
Saturday, January 19, 2013
Weight Saving
For fun, I borrowed a digital scale from the science lab at school and compared the two rear axles.
The stock, steel one: 828 grams, which works out to 1lb, 13 oz!
Next, I put the Triumph 675 rear axle on the scale -- aluminum, and hollowed out. The result was 408 grams, which works out to 14.392 oz!
The result is a rear axle that is half the weight of stock, or 420 grams lighter, or 14.815 oz -- nearly a pound!
The stock, steel one: 828 grams, which works out to 1lb, 13 oz!
Next, I put the Triumph 675 rear axle on the scale -- aluminum, and hollowed out. The result was 408 grams, which works out to 14.392 oz!
The result is a rear axle that is half the weight of stock, or 420 grams lighter, or 14.815 oz -- nearly a pound!
Wednesday, January 16, 2013
Sunday, January 13, 2013
More Sponsorship News!
For 2013 (and beyond, likely!) Piston Broke Racing will be sporting Pilot Leathers. As a part of their rider support program, I will be wearing a set of custom-made leathers -- Pilot will be constructing an "EVO" model 1-piece suit, made to my "oversquare" dimensions. As a part of the process, the guys at Pilot have sent a first draft of their suit design.
Note the sponsor patches, and proper "Piston Broke Racing" logo. I was able to list the names of PBR sponsors, and sent a jpeg of the race number as well as the PBR logo in a vector file. While this is not the final version, it gives you a sense of what the set of skins will look like. The process is quite simple, in that pilot has a measurement form, where someone can measure/reveal the awful truth about your actual body size, and this can be sent to pilot for them to construct. A custom suit is more expensive, however not much more than a new, top of the line Spyke or Arlen Ness, and actually cheaper than a Kushitani suit. Furthermore, sponsor patches and logos are included in the price. If you are more "normally" proportioned, an off the rack suit is cheaper, and they also have "split sizing" available. Since I am 5'8", 200 lbs, with a 29" inseam and a 45" chest, I am NOT "off the rack". Using engine terminology, I am "oversquare" -- a short stroke with a larger bore!
I've asked the designers to use this suit design to compare, and try the PBR logo on the front, rather than the back. Not sure how it will work with the zipper splitting the logo, however... Obviously the 91 will have to be another color other than red.
If anyone is interested in getting a good deal on a top of the line Spyke Titanium suit in 48/58, I've posted it to the Wera forums here: http://weraclassifieds.com/ads/spyke-titanium-suit-for-sale-free-boots-included/
Note the sponsor patches, and proper "Piston Broke Racing" logo. I was able to list the names of PBR sponsors, and sent a jpeg of the race number as well as the PBR logo in a vector file. While this is not the final version, it gives you a sense of what the set of skins will look like. The process is quite simple, in that pilot has a measurement form, where someone can measure/reveal the awful truth about your actual body size, and this can be sent to pilot for them to construct. A custom suit is more expensive, however not much more than a new, top of the line Spyke or Arlen Ness, and actually cheaper than a Kushitani suit. Furthermore, sponsor patches and logos are included in the price. If you are more "normally" proportioned, an off the rack suit is cheaper, and they also have "split sizing" available. Since I am 5'8", 200 lbs, with a 29" inseam and a 45" chest, I am NOT "off the rack". Using engine terminology, I am "oversquare" -- a short stroke with a larger bore!
I've asked the designers to use this suit design to compare, and try the PBR logo on the front, rather than the back. Not sure how it will work with the zipper splitting the logo, however... Obviously the 91 will have to be another color other than red.
If anyone is interested in getting a good deal on a top of the line Spyke Titanium suit in 48/58, I've posted it to the Wera forums here: http://weraclassifieds.com/ads/spyke-titanium-suit-for-sale-free-boots-included/
Saturday, January 12, 2013
Rebuild
The forks have been returned, which allows the installation of more new and/or modified parts. On Thursday, I returned home from work to be greeted with this waiting for me... nice! I tore it open, and including the rebuilt forks, I had the components of the old fork innards, and the sponsorship swag as well. Sweet.
Forks went on quite easily. Note decal on fork bottom. There is a nice rubber ring on the other fork leg to gauge fork travel. No more zip ties for me!
The forks allowed me to install the dash. I've changed the design somewhat (a few times, actually) but I think I have something that is compact, and allows me to mount the lap timer (on top) and the temp gauge (below the gauge) to the same piece.
The new dash had a knock-on effect in that the steering damper had to be replaced with a traditional side-mount unit. I sold the GRP damper for $100, and bought this WP unit for $70. The previous owner indicated it was not adjustable, but he goofed -- this one has 7-8 clicks of adjustment as a decent WP damper should! The rag is there to catch any drips -- I've removed the brake lines to allow the installation of the new Speigler lines to the R6 calipers.
I tracked down a quick turn Domino throttle. This has been a bit of a bugbear for me, even the other solutions I have tried from stock still required far too much twist to open the throttles right up. This is the solution... likely a 1/5 turn throttle, ready to unleash the massive 71 horsepower! Scotty at Transcanada let me root through a bin of unclaimed throttle cables to get an outer sleeve that would work. As usual, I custom-made the inner wire, soldering on the ends after cutting the stainless wire to suit.
Vortex offered a 50% off deal for racers who are a part of their support program. I jumped at the chance and got a matching clutch lever to go with the 636 perch scored off of eBay.
The bellypan has made some progress as well. This is where it is at now... I've applied one coat of "microspheres" -- a powdery mix you add to epoxy resin (until you get the desired viscosity), and then spread it on the panel. I think it will make a nice surface for paint prep, is far lighter than typical bondo, but sands to a fine talcum powder-like consistency that likes to hang in the air for quite some time. A breathing filter is absolutely critical when working with these microspheres -- they are tiny glass bubbles... not something you want to breathe into your lungs!
A word about the temperature. Working in the garage today it was -21 Celsius... that is -6F for you Fahrenheit types. When sanding with the mask on, the humidity from your breath coats the inside of the breathing apparatus with condensation, and if the mask is left outside afterward, it freezes solid. Your fingertips get so numb that you lack any tactile sensation, so you are constantly dropping nuts and bolts. Finally, for several hours afterward, your fingers feel like needles are jabbing into them... a sign of minor frostbite. I have decided that a summer project is to finally insulate the garage... for NEXT winter!
Forks went on quite easily. Note decal on fork bottom. There is a nice rubber ring on the other fork leg to gauge fork travel. No more zip ties for me!
The forks allowed me to install the dash. I've changed the design somewhat (a few times, actually) but I think I have something that is compact, and allows me to mount the lap timer (on top) and the temp gauge (below the gauge) to the same piece.
The new dash had a knock-on effect in that the steering damper had to be replaced with a traditional side-mount unit. I sold the GRP damper for $100, and bought this WP unit for $70. The previous owner indicated it was not adjustable, but he goofed -- this one has 7-8 clicks of adjustment as a decent WP damper should! The rag is there to catch any drips -- I've removed the brake lines to allow the installation of the new Speigler lines to the R6 calipers.
I tracked down a quick turn Domino throttle. This has been a bit of a bugbear for me, even the other solutions I have tried from stock still required far too much twist to open the throttles right up. This is the solution... likely a 1/5 turn throttle, ready to unleash the massive 71 horsepower! Scotty at Transcanada let me root through a bin of unclaimed throttle cables to get an outer sleeve that would work. As usual, I custom-made the inner wire, soldering on the ends after cutting the stainless wire to suit.
Vortex offered a 50% off deal for racers who are a part of their support program. I jumped at the chance and got a matching clutch lever to go with the 636 perch scored off of eBay.
The bellypan has made some progress as well. This is where it is at now... I've applied one coat of "microspheres" -- a powdery mix you add to epoxy resin (until you get the desired viscosity), and then spread it on the panel. I think it will make a nice surface for paint prep, is far lighter than typical bondo, but sands to a fine talcum powder-like consistency that likes to hang in the air for quite some time. A breathing filter is absolutely critical when working with these microspheres -- they are tiny glass bubbles... not something you want to breathe into your lungs!
A word about the temperature. Working in the garage today it was -21 Celsius... that is -6F for you Fahrenheit types. When sanding with the mask on, the humidity from your breath coats the inside of the breathing apparatus with condensation, and if the mask is left outside afterward, it freezes solid. Your fingertips get so numb that you lack any tactile sensation, so you are constantly dropping nuts and bolts. Finally, for several hours afterward, your fingers feel like needles are jabbing into them... a sign of minor frostbite. I have decided that a summer project is to finally insulate the garage... for NEXT winter!
Wednesday, January 2, 2013
Wheels have Arrived
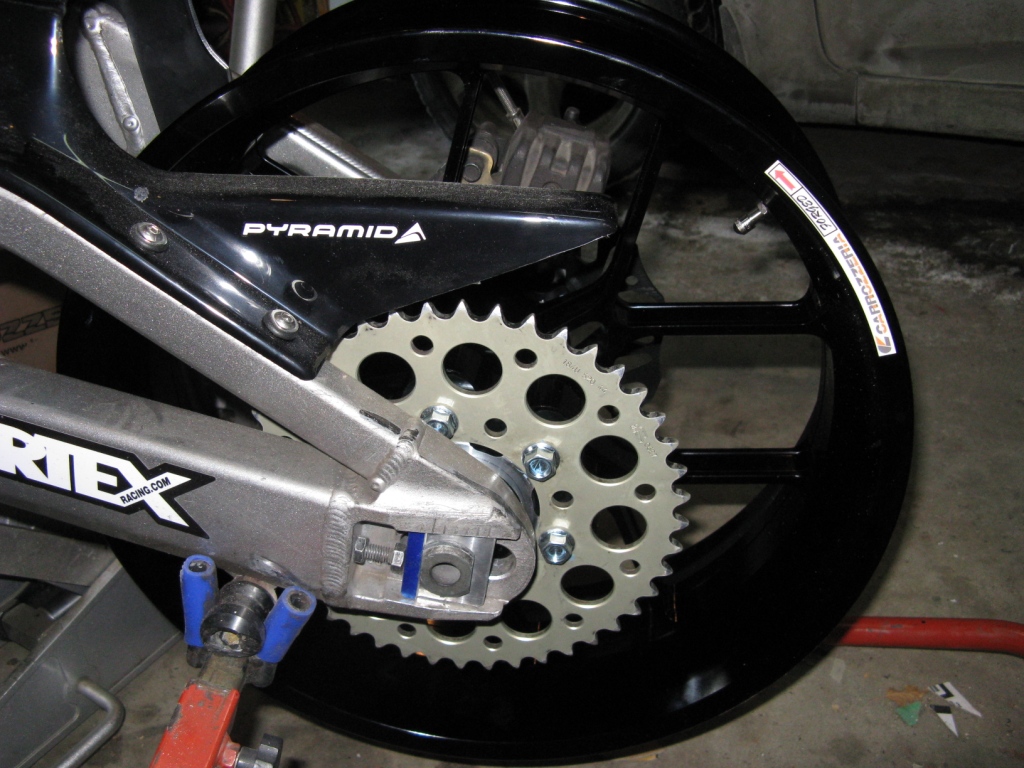
As promised, the Carrozzeria wheels have shown up for the racebike. As advertised, these are things of rotational beauty! I test fitted the rear wheel, offering it up to the Versys swingarm.
The wheel fit perfectly! The spacers used are "captured" in that they don't fall out and roll all over the garage when you line things up. A great looking rim that is 5.5" in width, which will allow for a 180 rear tire.
As a bonus, the bolt pattern is "stock" Kawasaki, in that it works with zx6r/10r sprockets from about 2003 onwards. That means, my Renthals will work with these wheels! Bonus, indeed!
Even more good news! The great crew at Carrozzeria also sent an ultralightweight rear rotor at no extra charge. Check it out! As you might imagine, using the exclamation! mark! is pretty easy today!!!
As I am still waiting on the front forks to come back from RaceTech, the front has yet to be test-mounted. I also have a set of wavy zx6r discs that I hope will fit these rims. When I pick those up, I will be sure to post more pics. This picture turned out a bit blurry, sorry.
Even has a trick directional sticker to help mounting tires.
Based on what I have seen so far, these wheels are an awesome deal, considering many factors...
The wheel fit perfectly! The spacers used are "captured" in that they don't fall out and roll all over the garage when you line things up. A great looking rim that is 5.5" in width, which will allow for a 180 rear tire.
As a bonus, the bolt pattern is "stock" Kawasaki, in that it works with zx6r/10r sprockets from about 2003 onwards. That means, my Renthals will work with these wheels! Bonus, indeed!
Even more good news! The great crew at Carrozzeria also sent an ultralightweight rear rotor at no extra charge. Check it out! As you might imagine, using the exclamation! mark! is pretty easy today!!!
As I am still waiting on the front forks to come back from RaceTech, the front has yet to be test-mounted. I also have a set of wavy zx6r discs that I hope will fit these rims. When I pick those up, I will be sure to post more pics. This picture turned out a bit blurry, sorry.
Even has a trick directional sticker to help mounting tires.
Based on what I have seen so far, these wheels are an awesome deal, considering many factors...
- they are cheaper than Marvic and Marchesini, as well as Dymag.
- From what I can see, they are on the only manufacturer of bespoke wheels for the ex650/er6.
- It was fairly straightforward to order -- I indicated that the front and rear were from different models, but they had no problem sending me what I needed.
- All the stock hardware fits -- rotors, sprockets, spacers, etc.
- If you are a supertwin/mintwin racer, you should really consider these wheels. Many other color options are available, and they of course have a front rim to work with the stock ex650 forks (for minitwin racers)
- Considering the pound/euro vs US dollar right now, British/Euro riders should really consider these wheels as an upgrade for their bikes.
I shudder to think of the hassle of retrofitting wheels from other machines onto my project. I doubt anything would have fit as nice as these did... I envisioned the purchase price (when suitable wheels could be found), and then the hassle of machining the necessary spacers and etc. to make them work. This is a bolt on affair!
Of course, the Level 2 sponsorship discount sweetened the deal considerably, but even at the list price, these ARE the only option, in my opinion. Getting the rear rotor thrown in for free only added to the quality of these rims.
Factoring the weight saving of the hollow rear axle, and these wheels, the bike will likely be noticeably lighter on its feet come the spring. I can't wait.
For now, the wheels will be stored downstairs out of the cold. No sense mounting new race rubber and then letting them freeze outside!
Sunday, December 23, 2012
Preliminary Schedule for 2013
According to the MRA Website, the season starts early and cold! Two rounds in May this year. As well, it looks like Trackaddix is doing a May round at Motorsports Park Hastings in the spring (finally!) Not sure how it will work out scheduling-wise, but I would really like to get there, especially considering it is during the Victoria Day long weekend and so I would only have to take 1 extra day off of work:
Round 1: May 11 and 12 (Long Underwear Special)
Hastings: May 18 and 19
Round 2: May 25 26
Round 3: June 22 23
Round 4: July 20 21
Round 5: Aug 17 18
Round 6: Sept 21 22
So 3 race weekends in 3 weeks in May. If I can manage it, it should put me in good stead for the remainder of the season.
Eagerly anticipating some visits from the postman. Forks are on their way back from Racetech, wheels have cleared Canada Customs, and the shock should be built and sent sometime in January. The bike is really coming together!
Round 1: May 11 and 12 (Long Underwear Special)
Hastings: May 18 and 19
Round 2: May 25 26
Round 3: June 22 23
Round 4: July 20 21
Round 5: Aug 17 18
Round 6: Sept 21 22
So 3 race weekends in 3 weeks in May. If I can manage it, it should put me in good stead for the remainder of the season.
Eagerly anticipating some visits from the postman. Forks are on their way back from Racetech, wheels have cleared Canada Customs, and the shock should be built and sent sometime in January. The bike is really coming together!
Subscribe to:
Posts (Atom)